Register to receive free access to all teacher materials.

l Projects
Print
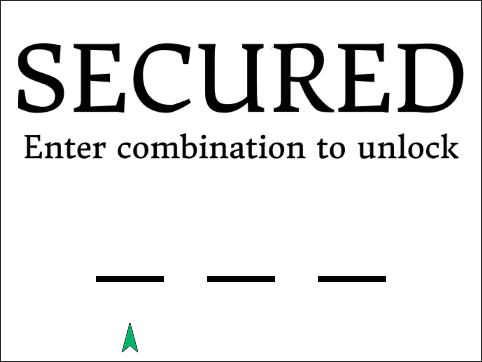
Snap! Combination Lock
Use variables and procedures to make the Hummingbird turn a servo when someone enters the correct combination
Programming Language
Snap!
Subjects
Programming Tutorials
Grades
6-8, 9-12
Free Teacher Materials
Objective & Learning Goals
- Segment sensor values
- Use variables to store information
- Create custom blocks with parameters
- Broadcast and receive messages in Scratch
Hummingbird setup
- Print out the dial template or design your own.
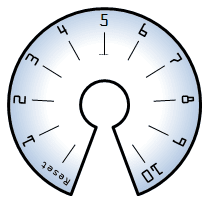
- Cut out the dial and glue or staple it to a piece of cardboard.
- Cut a small slit below the 5 that lines up with the bump on the rotation sensor.
- Attach the dial to the rotation sensor.
- Twist the rotation sensor counter-clockwise as far as it will go.
- Cut a small arrow shape out of cardboard and wedge it into the slit in the rotation sensor so that it points toward the word “Reset”.
- Connect the rotation sensor to sensor port 1 of the Hummingbird.
- Add a tri-color LED to port 1.
- Connect a servo to servo port 1.
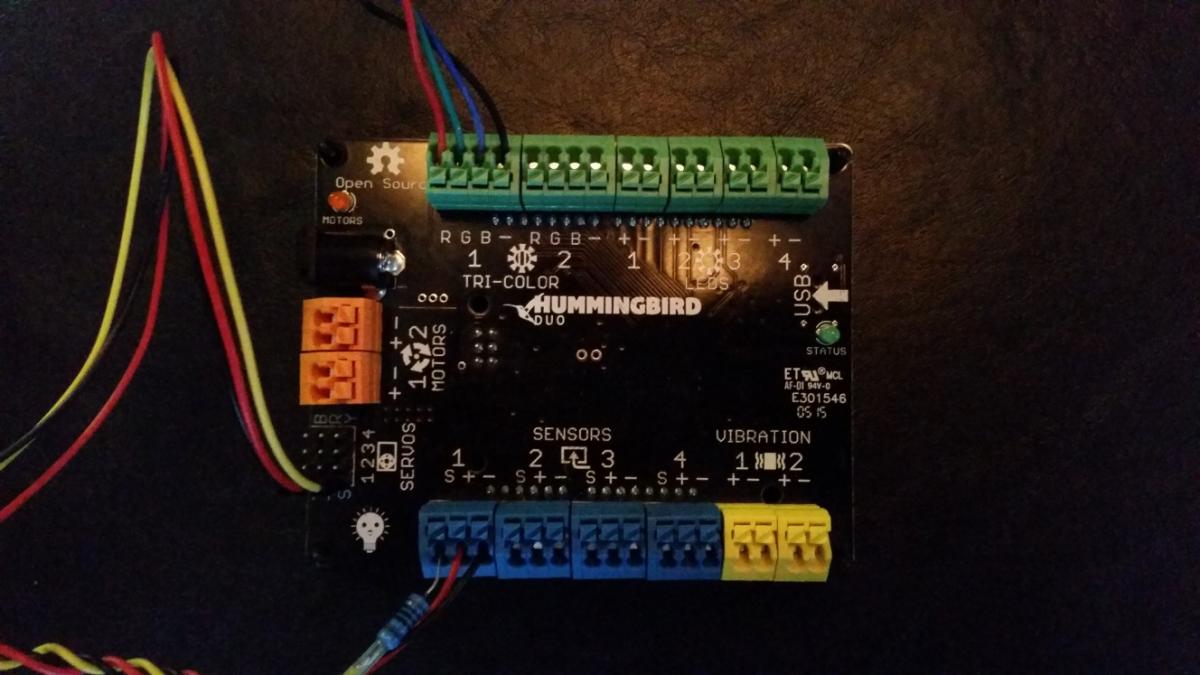
- Plug the Hummingbird into a wall socket and into your computer.
Measurements
- Select a three-digit combination to use with the lock. We chose 4-8-1.We want to detect when the arrow is pointed toward the correct number, but we also want to leave a little room for error. We need some way of measuring the rotation sensor’s output when the arrow is in the correct position.
- Drag a Hummingbird knob block on to the screen and set it to port 1.
- Twist the dial to the first digit of your combination (1 in our case).
- Click the block and the current value for the rotation sensor will appear.

- Write down an upper and lower bound for each position to give some margin for error. If the value of the rotation sensor is within the two numbers, it will be considered correct.
- After you have recorded the upper and lower bounds for each of the 3 digits, delete the block (right-click, delete).
Programming steps
We need a way to see if the dial is currently twisted to a certain position. We will be performing this check three times, so it would be nice if there was a way to make the code once but use it multiple times. To do this, we will define a new block.
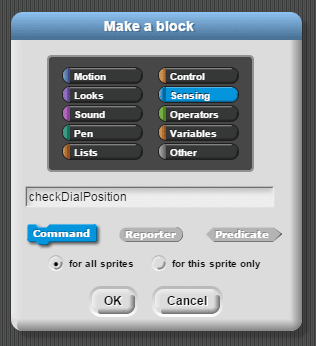
- Click “Variables” and select “Make a block”.A custom block groups many blocks into one block. It can take inputs and do something with them, just like any other block. This block will check to see if the dial position is within a set of upper and lower bounds.
- Name this block “checkDialPosition”.
- Select “Sensing” as the category for this block, as we will be using many sensor blocks. Then click “OK”.
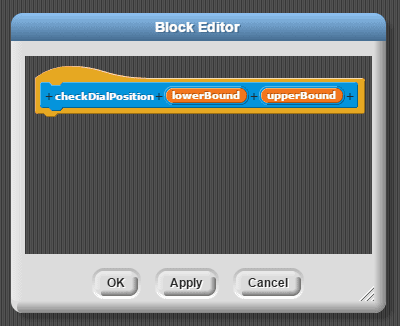
- We want the checkDialPosition block to have two inputs. Click the “+” to the right of the blue block and make an input named “lowerBound”. Then do the same for a second input named “upperBound”. Then click “OK”.
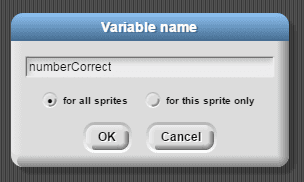
- We want the program to remember how many numbers were entered correctly. To remember this, we need to add a variable. Click “Variables” and “Make a Variable”.
- Name the variable “numberCorrect” and make it accessible to all sprites.
- Go to the “Sensing” category and find the “checkDialPosition” block you just made. Right-click it and choose “edit”.
- Now we want the checkDialPosition block to increase the numberCorrect only if the rotation sensor value is greater than or equal to the lower bound and less than or equal to the upperBound. Arrange an if statement, an “And” block (in the Operators category), a “<” block, a “>” block, and two knob sensor blocks in the following configuration:
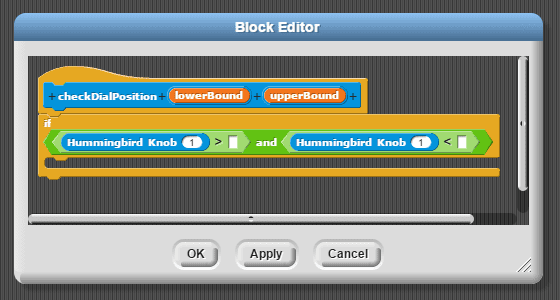
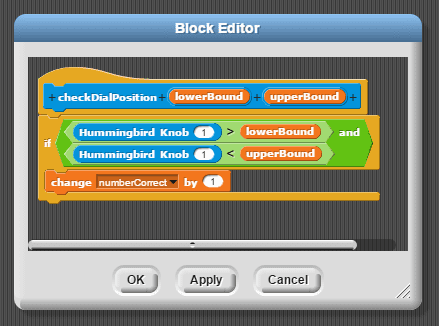
- Drag the lowerBound and upperBound inputs into the correct places.

- Now we want to add one to the numberCorrect. Go to the “Variables” category and use a “change by 1” block to accomplish this.
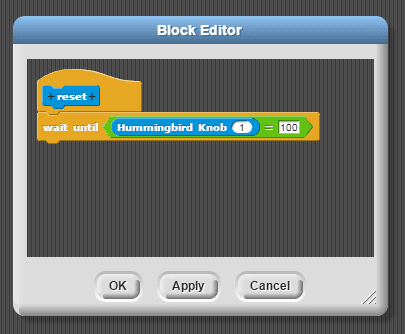
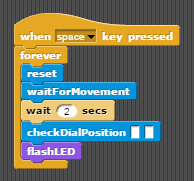
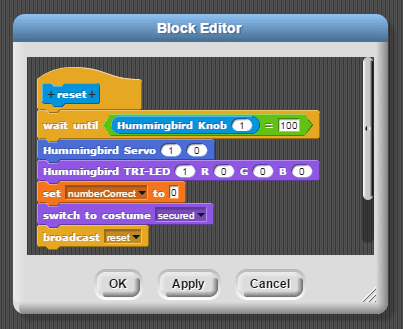
 The program will first wait for the dial to be moved to the reset position. It will then read the dial three times with a two second delay between each reading (to give time for the user to turn the dial). Finally, the program will check the numberCorrect and turn the servo if it equals three. We need a block that waits for the user to turn the dial to reset and then resets the servo position and turns off the LED.
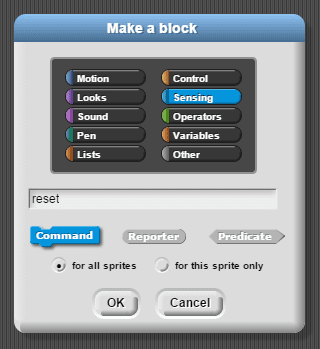
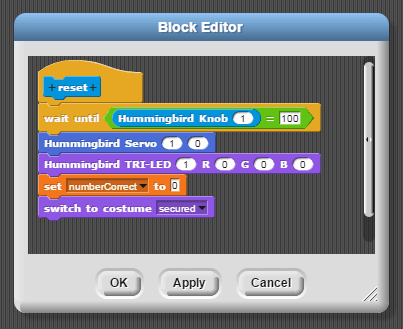
 - Go to the “Variables” category, Make the a block, and name it “reset”.
- The reset block should go under the “Sensing” category.
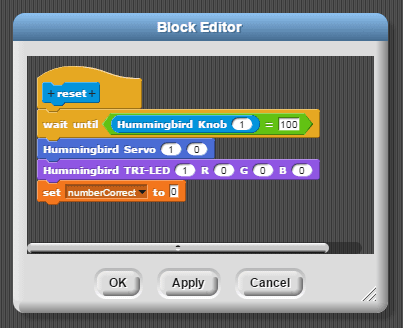
- We want the program to wait until the dial is at reset (100). We can use a wait until block in the Control category to do this. Add the wait until block, an equals block, and a knob sensor block to the reset block’s definition like this:
- When it does reach 100, we want to reset the servo (set it to 0) and turn off the LED. It should also set numberCorrect to 0.
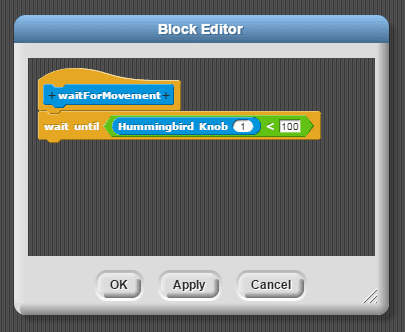
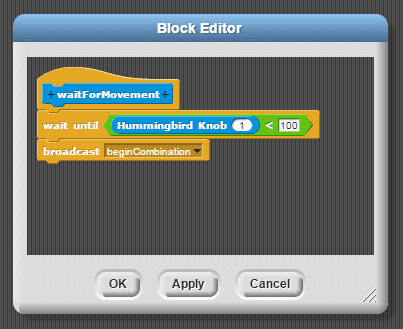
- Now that the dial is reset, we want to wait until the dial is moved a significant amount before taking the first reading. Make a block “waitForMovement” that waits until the rotation sensor value is less than 100. It should also go under the “Sensing” category.
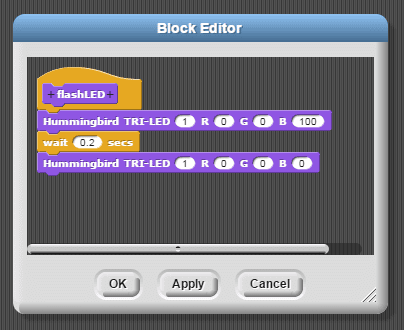
- We should give the user some feedback when the dial is read so that he or she knows to move to the next dial position. We will do this by flashing the LED blue for 0.2 seconds. Make a procedure named flashLED that does this. This time, assign the block to the “Looks” category.
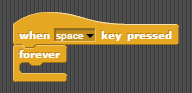
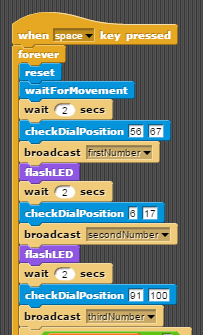
 We are now ready to make the main piece of code! We want this to run when the space bar is pressed and loop forever.
- First, let’s reset the lock and then wait for it to be turned. The reset and waitForMovement procedures should do this. Drag them in from the “Sensing” category.

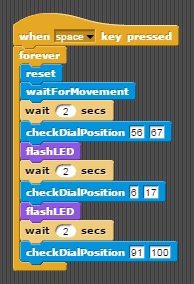
- Now, let’s wait 2 seconds to give the user time to move the dial to the first position. Then we will read to see if it is correct and flash the blue LED. Use delay, checkDialPosition, and flashLED to do this.
- Add the upper and lower bounds for the first digit of your combination.

- Do the same for the second and third digits. Don’t flash the LED for the last digit.
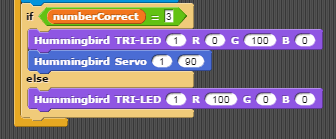
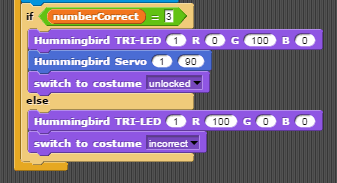
- Finally, if the numberCorrect = 3, turn the servo to 90 and make the LED green. Else, make the LED red.
- Now run the code! Twist the dial to reset. Then enter the combination, waiting for the light to blink after each number. If the combination is correct, the servo should turn. You can hide the numberCorrect variable by unchecking the checkbox in the “Variables” category.
Graphics
The Hummingbird part of your program is complete! Now let’s add some graphics to indicate how many numbers the user should enter and show when the measurements are being taken.
- Rename the current sprite so that its name is “Text”. This sprite will be responsible for the text that will appear on the screen.
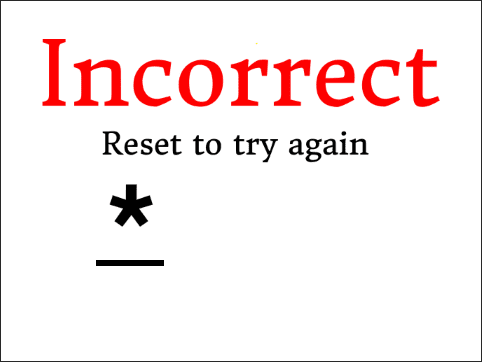
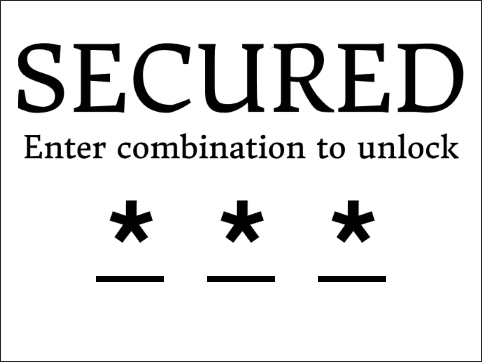
- Design three costumes for the Text sprite: one showing that the servo is in the locked position, one stating that the combination was incorrect, and one showing that it is unlocked. Name the costumes accordingly.
Locked:
 Incorrect:
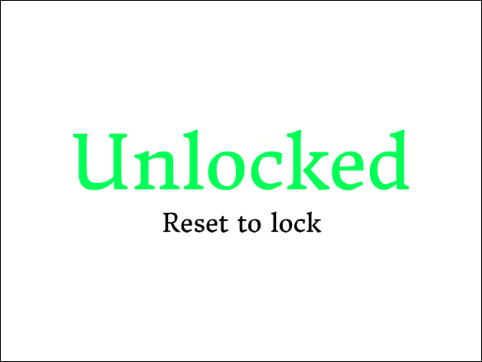
 Unlocked:
- Add “switch costume” blocks into the reset block’s definition and the if/else sections of the forever loop.
- Run the project by pressing the space bar. The text on the screen should now indicate the current state of the lock.
- Now let’s make some sprites that show how many digits have been entered. Make a new sprite with the paint brush button.

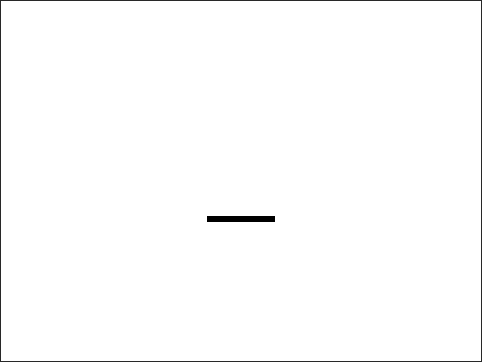
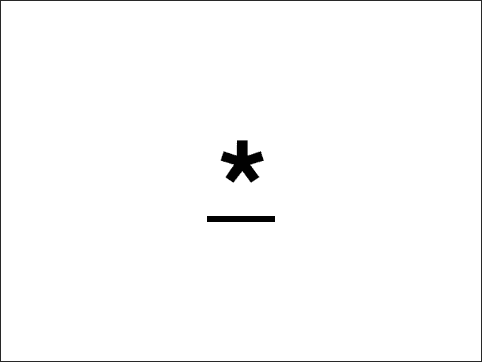
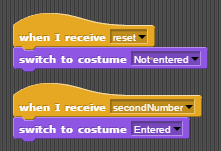
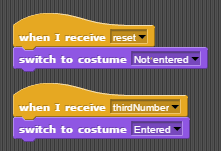
- Give the sprite two costumes: one for when the digit it represents has not been entered and one for when it has.Not entered:
 Entered:
- Name the sprite “Digit1”.
- Drag this sprite to an appropriate location on the screen in the corner (called the stage). Be sure to leave room for other sprites.
- This sprite represents the first digit. We will make two more copies of it for the other digits. But before we do that, let’s add some scripts to this sprite. Select the “Scripts” tab.The page will now be blank. This is because each sprite has its own set of scripts. These scripts control the properties of that specific sprite. For example, placing a switch costume block in the scripts of the sprite named “Text” (like we just did) will cause that sprite to change its costume. Putting the same block in the scripts of the Digit1 sprite would cause Digit1 to change its costume. The scripts tab only shows the scripts of the sprite that is currently selected. Scripts from different sprites can communicate with each other using “broadcasts”.
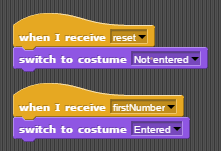
- Edit the reset block and add a broadcast block from the Control category to the reset block’s definition. Click the dropdown on the broadcast block and click “new”. Call it “reset”. This will tell other sprites to reset their positions.
- Add another broadcast block named “beginCombination” at the end of the waitForMovement block’s definition.
- Select the Text Sprite and add a broadcast block after each checkDialPosition block in the forever loop. Name them “firstNumber”, “secondNumber”, and “thirdNumber”, respectively.
- Now switch back to the Digit1 sprite and add two broadcast received blocks from the “Control” category and connect a switch costume block to each. Click the drop down on each broadcast received block and select the correct broadcast. If you don’t see the one one you are looking for, click “new” and type its name.
- Duplicate the Digit1 sprite twice and change the broadcasts to receive secondNumber and thirdNumber.Digit2 sprite:
 Digit3 sprite:
- Position the sprites in a line.
- Run the project and the digits will enter themselves as the dial is turned.We could stop here, but the user still does not know how much time he/she has before a reading will be taken. We can fix this by adding an indicator that shows when a reading will be taken.
- Create a new sprite with the “New turtle sprite” button.

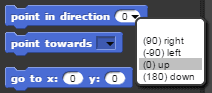
- Click the “Motion” category and select “0” from the drop down on the “point in direction” block. Then click the block. The arrow should now point up.
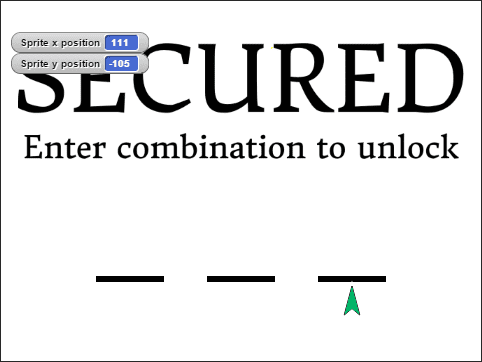
- Drag the arrow sprite so that it is below the first digit.
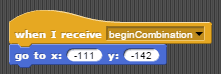
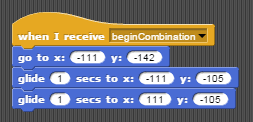
- Under the scripts tab, add a broadcast receive block for the beginCombination message.

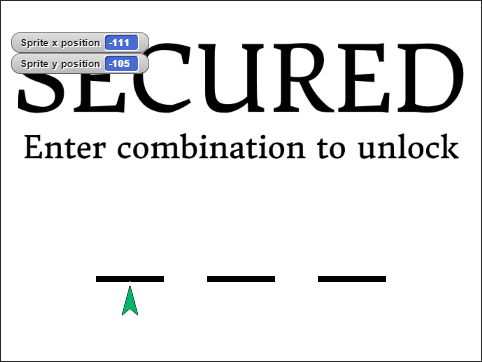
- In the “Motion” category, check the boxes next to the x and y position blocks. You will then be able to see the coordinates of the arrow.

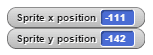
- Attach a “go to” block from the “Motion” category to the broadcast block. Enter the sprite’s coordinates into the block.
- Move the sprite so that it is touching the first digit.
- Add a “glide to” block below the “go to” block and enter the new coordinates.
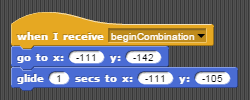
- Move the sprite so that it is touching the last digit.
- Add another “glide to” block with coordinates.
- Place a “show” block (from the “Looks” category) above the first block and a “hide” block below the last one.
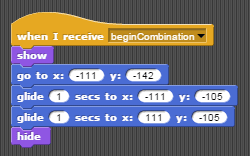
- The arrow should touch each digit as that digit is read. To time this correctly, the first glide block should be set to 2 seconds, and the second one should be 4.6 seconds.
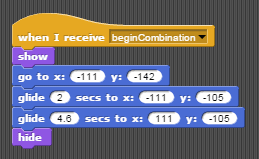 Your code is complete! The arrow should point to each digit as it is recorded. Great job!