Lesson 3 – micro:bit Display

Hummingbird Components

None

Python Concepts

Lists

Teacher Materials

Get Access

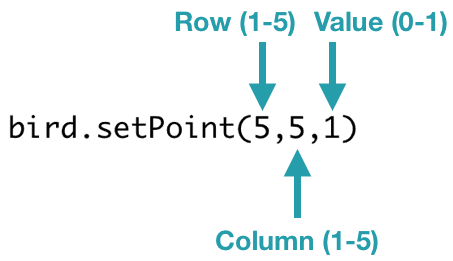
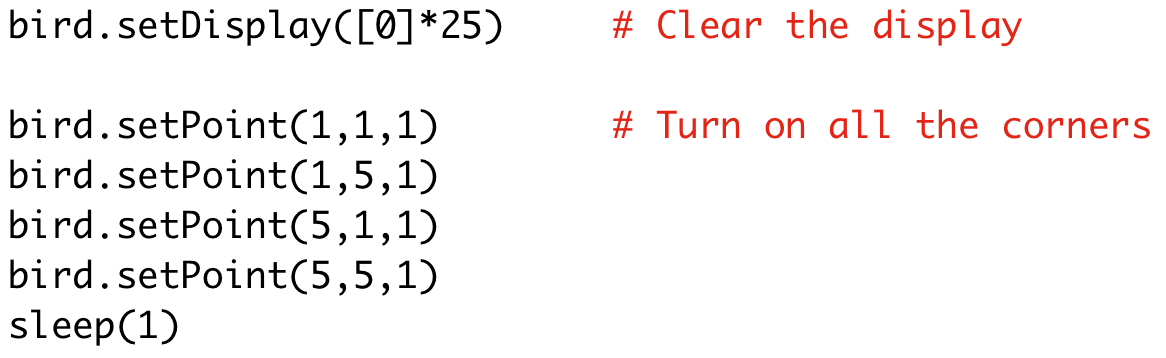
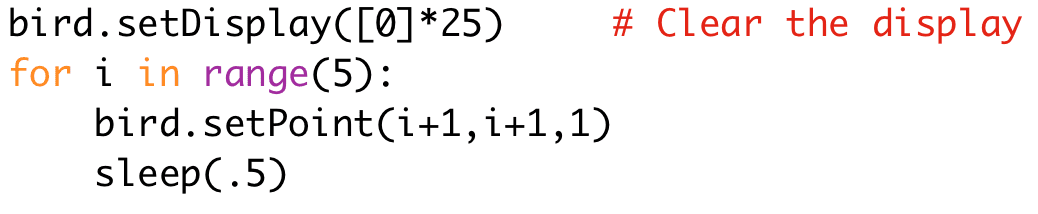
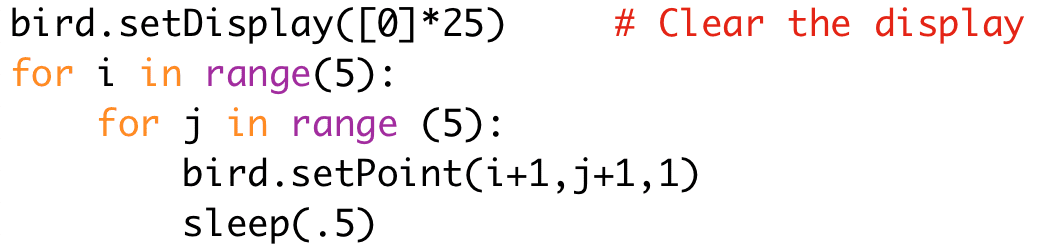
In the last two lessons, you have learned to use the LEDs in your Hummingbird kit. There are also LEDs on the micro:bit. These 25 tiny LEDs are arranged in a 5 by 5 grid. In this lesson, you will write programs that use these LEDs to make letters and pictures.

To write letters and numbers on the micro:bit, use the print() method. This method takes a string parameter, which is text within quotation marks (single or double quotes). The string must have 15 or fewer characters and should contain only digits and English letters (upper or lower case).

The print() method displays the string on the micro:bit LED array one letter at a time. For example, the code below shows the letter ‘H’ then the letter ‘i’ on the micro:bit.

Exercise 1

Print your name on the micro:bit. Make sure that the program pauses long enough to display all the letters before the program ends.

To display different patterns on the micro:bit, use the setDisplay() method. This method sets the LED array of the micro:bit to display a pattern defined by a list of length 25. Each value in the list must be 0 (off) or 1 (on). The first five values in the array correspond to the five LEDs in the first row, the next five values to the second row, etc. For example, this code lights up the top and bottom rows on the micro:bit display. This code shows the numbers for each micro:bit row on a different line. This isn’t required in Python, but it makes the code easier to read.

Exercise 2

Try out this code. Then modify the code to display a smiley face on the micro:bit display.

Exercise 3

Use a for loop to blink the micro:bit display between two different patterns. If you blink quickly between different patterns, you can create simple animations like a bunny hopping up and down.

The setDisplay() method sets all of the micro:bit LEDs at the same time. To turn individual micro:bit LEDs on or off, use the setPoint() method. This method takes three parameters. The position of the LED is given by the row and column parameters, which should both be between 1 and 5. The third parameter is the value of the LED, which must be 0 (off) or 1 (on).

Exercise 4

Try out this code. It should turn on the corners of the micro:bit display. Note that the first line clears the micro:bit display. [0]*25 is a Python shortcut for a list with 25 zeros.

Exercise 5

Modify the code from the previous exercise to turn all of the micro:bit LEDs on and then turn the corners off.

Exercise 6

What do you think this code will do? Make a hypothesis, and then test it out.

Extra Challenge

What do you think this code will do? Make a hypothesis, and then test it out. Then write your own program that uses one for loop inside another; this is called nesting.

Back to Top