Factor Pairs
Subjects
Math
Project Type
Real World Models
Required Tutorials
Position servo & LEDs
Estimated Time
Medium (3-6 hours)
Project Map
Learning Goals
Students will model factor pairs using Hummingbird Bit’s position servo.
Materials
- Hummingbird Bit Premium Kit
- Cereal box (1 per group)
- Possible Craft supplies
Tips
- Have students work in groups of 2-3.
- Our Printables page has a variety of documents for making teaching and learning with Hummingbird easier. Visit and explore resources like the My First Robot Design Notebook now.
Steps
This project sketch was to developed to meet Common Core math standard 4.OA.B (“Gain familiarity with factors and multiples.”). Students can be challenged to use a loop to move from 0° to 60° in steps. How many different step sizes will enable the motor to land directly on 60°?
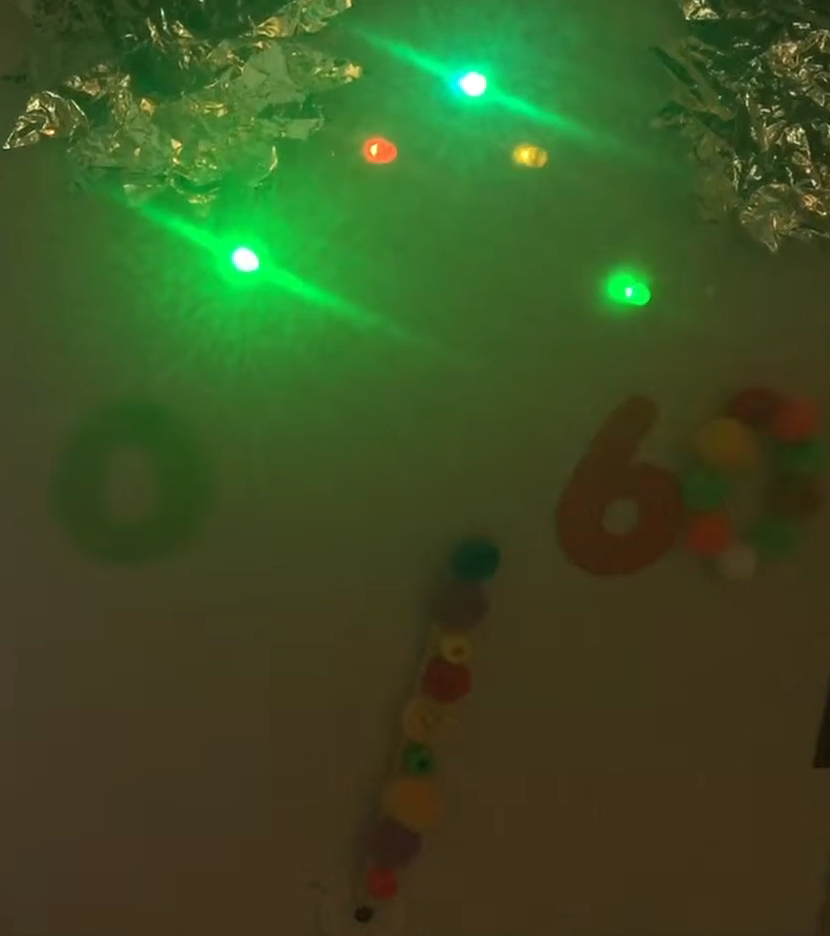
The video above shows one sample project, a robot that demonstrates the factor pairs for 60 by showing different ways of moving from 0° to 60°.
This project uses change blocks. These blocks are not shown by default in Scratch, but you can access them by opening the project HummingbirdStartWithChangers.sb2. You will also need a version of the BirdBrain Robot Server released after July 2015. A change block increases the value of a motor or light by a certain amount. For example, the block below will increase the value of LED 1 by 10. If the starting value of the LED is 30, then its final value will be 40. However, the value of the LED must always be between 0 and 100. If the starting value of the LED is 92, then the final value of the LED will be 100, not 102.
![]()
Negative numbers can also be used in the change blocks. The block below will decrease the value of the first servo motor by 5. If the starting angle of the motor is 120°, then its final value will be 115°. The value of the servo motor will always remain within its range of 0° to 180°.
![]()
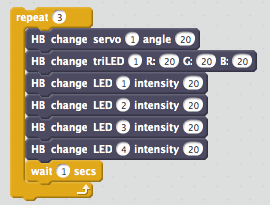
The sample robot uses one servo motor, four single color LEDS, and one tri-color LED. In addition, a Scratch sprite is used to display information on the computer screen. Each factor pair has a smaller number and a larger number. For each factor pair (except 1 and 60), a loop is used to increase the values of the servo and LEDs in a series of steps. The number of steps in the loop is determined by the smaller factor, and the size of each step is given by the larger factor. For example, the loop below changes the lights and motor in 3 steps of size 20.
The program for this project can become quite long if the robot uses multiple motors and lights. This is shown in FactorPairs.sb2. The length of the program is primarily due to sets of blocks that are repeated several times. That makes this project an excellent opportunity to teach students to define their own blocks using the Make a Block option in the More Blocks menu. FactorPairs2.sb2 shows the factor pairs program with two custom blocks. Using these custom blocks dramatically reduces the length of the program and the amount of repetition. Older students could take this project even farther by using math operators (including mod) to enable the program to compute the factor pairs for any number. This is shown in FactorPairs3.sb2.
Standards Alignment
This project aligns with Common Core math standards 4.OA.B and 4.MD.C. If the concept of custom blocks is included, this project could also be used to introduce older students to the idea of functions (8.F.A and 8.F.B). At the high school level, students can use custom blocks (or functions in text-based programming languages) and compute the factor pairs with math operators and nested control structures. This would address HSF.IF.A and HSF.BF.A. In addition, this project aligns with the Next Generation Science Standards for engineering at all grade levels (3-5-ETS1-1, 3-5-ETS1-2, 3-5-ETS1-3, MS-ETS1-1, MS-ETS1-2, MS-ETS1-3, MS-ETS1-4, and HS-ETS1-2).
Photo Gallery